
Drawing using only an eraser
In this week’s blog, I took on the challenge of drawing with an eraser. I will be creating, yet again, another portrait drawing, except this time I will be filling the page with charcoal – and using an eraser to carve out the face rather than drawing it traditionally with a pencil.
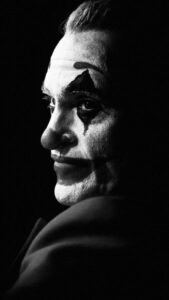
I did my usual thing and resorted to Pinterest to find a reference photo to work with. I found a picture of The Joker I liked and decided to use that. Before I started, I added a black and white filter to the photo to make my life a little easier.
To start, I took a stick of charcoal and an old skateboard deck and used the grip tape to rub the stick of charcoal on, to create a pile of charcoal dust. Once I had a substantial amount, I dumped it on my paper and used an old paintbrush I had laying around to blend it onto the page and cover it with charcoal.
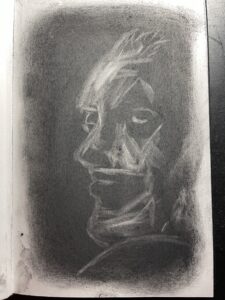
Once my page was covered in charcoal and I had my reference, I jumped right in and started with the erasing. I used a kneaded eraser for the entirety of the piece, mainly because of how easy it is to manipulate and erase small areas, as well as its ability to easily erase different shades and values.
I started with the left side edge of the face to get the basic shape down, then started working my way inward carving out the brightest parts of the skin. The Joker’s bright white face paint made it very apparent which parts should be erased the most, which I think made it a bit easier as well.
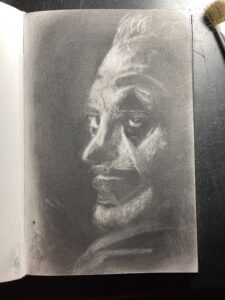
Throughout the drawing, I found myself picking up the paintbrush and dipping it back into the charcoal powder to brush back on top of my erased sections to develop different shades. I was constantly rotating back and forth from erasing, to brushing more charcoal on, to erasing again. This gave me the ability to create layers within my shading, and helped me in distinguishing detailed features of the face, like the shadow underneath the nose, the different shades between the top and bottom lips, lines and wrinkles in the face, etc.
This piece kind of reminded me of a piece I did in an earlier blog entry, where I did the negative drawing of the flower, shading it in reverse then inverting the colors afterwards. It felt similar in the sense of doing things in reverse. Rather than creating shadows by adding more darkness, I was creating them by carving out the lighter sections in between the shadows of the reference.
Overall, I enjoyed this process. It was a bit messy, and I had a bit of cleanup to do afterwards, with charcoal dust covering my desk. But the process itself was a lot of fun and challenged my brain a bit in having to approach things in reverse.


More Stories

Rain or shine, her style is on point
You may have seen her, strutting around in her fabulous outfits, warm or cold, rain or shine. VTSU Castleton senior Jess Emery never fails to eat us all up with her fashion game. Emery, an English major and communications minor, puts together some of the most eye-catching fits you will ever see. “I try not […]

Look out Vegas!
Student’s Casella artwork to be featured in Las Vegas Waste Expo Mid-October of last year, I started my Graphic Design internship with Casella Waste, an opportunity that fell from the sky for me. Ever since, I’ve been working on numerous projects regarding mostly print and digital graphics. I’ve done print ads, posters, graphics for social […]

Making art to add whimsy to dark world
I find creating art to be my source of therapy, my time to break away from the world and free all the thoughts that bounce around my mind. Illustrating onto paper or sculpting into a form using clay allows me to take my thoughts and turn it into something tangible. My hope is that the […]

Hamlet a great success
I sat in the middle row of the Casella Theater throbbing with anticipation. It was the opening night for the much-anticipated “Hamlet in Concert,” directed by Marisa Valent-Atland. I observed the proscenium in front of me, frantically chewing four sticks of gum in apprehension. My eyes were peeled wide open, ready for a night of […]

Album Review: KISS ‘Dynasty’
Music has a profound way of connecting with people; many listen for pleasure—others find that their playlist reflects their emotions. I admire the artistry of unique sounds and messages, as well as the craftsmanship to create modern masterpieces. In this column, I would like to share my perspective on albums spanning across all different eras […]

Coachella doesn’t disappoint, features mega-stars
This past weekend wrapped up the first weekend of Coachella 2025. The annual music festival is known for its big names and even bigger performances. This year included headliners Lady Gaga, Green Day, Post Malone and Travis Scott. Lady Gaga opened with “Bloody Mary” from her 2011 album “Born this Way.” Gaga is known […]