
Thinking small: drawing to the size of a quarter
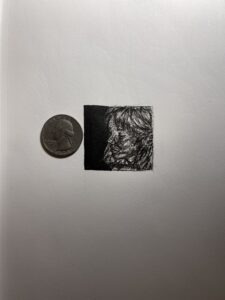
The challenge for this week is fairly simple: make a pen and ink portrait, except this time to make it as small as possible, while still retaining as much detail as possible. I’m referring to it as the “tiny art challenge.”
This challenge started with a quick trip to Michaels to look for the smallest pen I could find. After rummaging the shelves and testing out various pens, I ended up checking out with a 0.03.mm Artist’s Loft model.
Next step was to find the reference photo, which concluded fairly quickly after scrolling through some Pinterest pictures. I found a side profile image of a girl, which I liked because of the simplicity of it, as well as the contrast of the dark background and the lighting shining on her face.
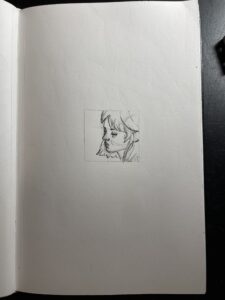
To start the drawing, I used a ruler and drew a small box in the middle of my sketchbook, about an inch and a half in height and width. Without hesitation I sharpened my pencil to the max and started as I usually would, using basic shapes to construct the size and proportions of the head, jaw, and facial features.
When approaching the inking process, it definitely felt a little more intimidating than usual. Inking can often be intimidating since there’s no erasing once you put the lines on the paper. But in this case, with the drawing being so small in size, it’s not as easy to correct your lines if they are out of proportion, since there is such little space to work with.
In other words, there was no scribbling my way out of this one. My strategy for doing this was to pretty much be as careful as possible, while also pressing down very lightly in case I do accidentally misplace something, since darker lines can really stand out when there is not much space to work with.
When it came to the shading, I used a similar strategy with just being very light with my strokes and paying close attention to the spots in the reference photo where the light was shining on her face. I wanted to make sure I had enough definition to still have a sense of form and dimension in my drawing, and making sure places like the bridge of her nose, cheekbone and chin didn’t feel too flat.
Once I had a base layer of shading, I kept slowly hatching more lines in the darker and deeper parts of the face, like below the eye, under the nose, and top of the chin. This process pretty much continued until I felt satisfied with the dimensions of the face, then finished off the piece by adding some shading and texture to the hair and filling in the background, which I feel does a good job at making the image pop.
Overall this was a fun process. Since the drawing is so small it was relatively quick to make, and I think I might continue drawing some more mini portraits for fun and fill this page with them. The biggest struggle I had was holding myself back from letting loose and just scribbling, since that’s often what I enjoy doing when I sketch. This forced me to be much more mindful of my pen strokes and areas of shading. For size reference, I’ll include my drawing compared to the size of a quarter.

More Stories

Rain or shine, her style is on point
You may have seen her, strutting around in her fabulous outfits, warm or cold, rain or shine. VTSU Castleton senior Jess Emery never fails to eat us all up with her fashion game. Emery, an English major and communications minor, puts together some of the most eye-catching fits you will ever see. “I try not […]

Look out Vegas!
Student’s Casella artwork to be featured in Las Vegas Waste Expo Mid-October of last year, I started my Graphic Design internship with Casella Waste, an opportunity that fell from the sky for me. Ever since, I’ve been working on numerous projects regarding mostly print and digital graphics. I’ve done print ads, posters, graphics for social […]

Making art to add whimsy to dark world
I find creating art to be my source of therapy, my time to break away from the world and free all the thoughts that bounce around my mind. Illustrating onto paper or sculpting into a form using clay allows me to take my thoughts and turn it into something tangible. My hope is that the […]

Hamlet a great success
I sat in the middle row of the Casella Theater throbbing with anticipation. It was the opening night for the much-anticipated “Hamlet in Concert,” directed by Marisa Valent-Atland. I observed the proscenium in front of me, frantically chewing four sticks of gum in apprehension. My eyes were peeled wide open, ready for a night of […]

Album Review: KISS ‘Dynasty’
Music has a profound way of connecting with people; many listen for pleasure—others find that their playlist reflects their emotions. I admire the artistry of unique sounds and messages, as well as the craftsmanship to create modern masterpieces. In this column, I would like to share my perspective on albums spanning across all different eras […]

Coachella doesn’t disappoint, features mega-stars
This past weekend wrapped up the first weekend of Coachella 2025. The annual music festival is known for its big names and even bigger performances. This year included headliners Lady Gaga, Green Day, Post Malone and Travis Scott. Lady Gaga opened with “Bloody Mary” from her 2011 album “Born this Way.” Gaga is known […]